What ASCII Art Does
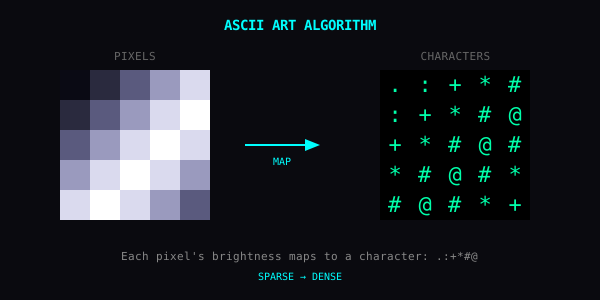
Yan divides the image into a grid. For each cell, it measures the average brightness, then picks a character whose visual density matches. Dark = sparse character (., ,). Bright = dense character (#, @).
You can test this transformation immediately in your browser with our free ASCII Art Generator.
Why It Still Looks Cool
ASCII art predates the JPEG. Print it to a dot-matrix and you'd have a 1985 demoscene title card. But it's also a forced abstraction — you stop seeing the photo as a photo and start seeing it as marks on a page.
Type is shape. ASCII is the shape of light.
Parameters
Block Size (4–16 px)
The cell each character represents.
- 4–6: detailed, almost photographic
- 8–10: classic ASCII look, readable
- 12–16: chunky, posterized
Color Mode
- Off: pure green-on-black terminal classic
- On: characters keep the original cell color
Edge Weight (0–100%)
Boosts characters along high-contrast edges. Higher = stronger outlines.
Dither Amount (0–100%)
Adds randomness to character pick. Prevents banding in smooth gradients.
Dual Layer
Renders both background tint and foreground glyph. Off = flat. On = depth.
White Fallback
Swaps the default black canvas for white. Color-on-white reads more like print, less like a terminal.
Region vs Global
Yan ships ASCII Art in two scopes:
- Regional (default): only the bright detected areas turn into characters. The rest of the photo stays as pixels. Makes the ASCII zones pop as glitch insets.
- Global: the whole image becomes characters. Pure ASCII portrait.
Regional mode is governed by the same brightness detection used for the other glitch modes — pixels in the configured brightness band become candidate regions. Global mode skips detection entirely and processes every cell.
Presets
- Green Terminal: phosphor green on black. The classic.
- Amber CRT: amber on black. 1980s minicomputer.
- Cyber Neon: high-contrast color, magenta/cyan bias.
- Paper Type: black ink on warm white. Print-like.
- Matrix Rain: pure katakana-style cascade.
Good Subjects
- Portraits: faces ASCII-ify surprisingly well — the eyes anchor it
- High-contrast scenes: shadows and highlights give the algorithm something to chew on
- Text and logos: type rendered as type. Meta-cool.
- Architecture: lines map naturally to characters
What to Avoid
- Busy, low-contrast images: everything becomes the same character
- Tiny important details: block size will eat them
Combinations
- ASCII + CRT: terminal-on-terminal. Layered analog cosplay.
- ASCII + RGB Shift: chromatic aberration on characters. Tom Clancy hacker scene.
- ASCII + Block Jitter: corrupted teletext.
The Idea
ASCII art is the original compression: a million pixels into a few hundred characters. Lossy, but the loss is the point.